Airflow is an open-source platform to author, schedule and monitor workflows and data pipelines. When you have periodical jobs, which most likely involve various data transfer and/or show dependencies on each other, you should consider Airflow. This blog post briefly introduces Airflow, and provides the instructions to build an Airflow server/cluster from scratch.
A Glimpse at Airflow under the Hood
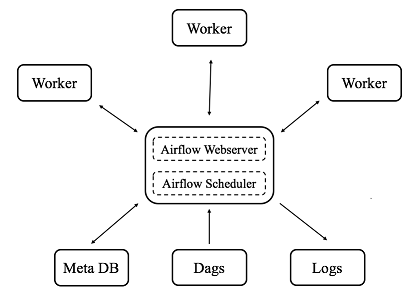
Generally, Airflow works in a distributed environment, as you can see in the diagram below. The airflow scheduler schedules jobs according to the dependencies defined in directed acyclic graphs (DAGs), and the airflow workers pick up and run jobs with their loads properly balanced. All job information is stored in the meta DB, which is updated in a timely manner. The users can monitor their jobs via a shiny Airflow web UI and/or the logs.
Although you do not necessarily need to run a fully distributed version of Airflow, this page will go through all three modes: standalone, pseudo-distributed and distributed modes.
Phase 1: Start with Standalone Mode Using Sequential Executor
Under the standalone mode with a sequential executor, the executor picks up and runs jobs sequentially, which means there is no parallelism for this choice. Although not often used in production, it enables you to get familiar with Airflow quickly.
-
Install and configure airflow
# Set the airflow home
export AIRFLOW_HOME=~/airflow

# Install from pypi using pip
pip install airflow

# Install necessary sub-packages
pip install airflow[crypto] # For connection credentials protection
pip install airflow[postgres] # For PostgreSQL DBs
pip install airflow[celery] # For distributed mode: celery executor
pip install airflow[rabbitmq] # For message queuing and passing between airflow server and workers
... # Anything more you need

# Configure airflow: modify AIRFLOW_HOME/airflow.cfg if necessary
# For the standalone mode, we will leave the configuration to default
-
Initialize the meta database (home for almost all airflow information)
# For the standalone mode, it could be a sqlite database, which applies to sequential executor only
airflow initdb
-
Start the airflow webserver and explore the web UI
airflow webserver -p 8080 # Test it out by opening a web browser and go to localhost:8080
-
Create your dags and place them into your DAGS_FOLDER (AIRFLOW_HOME/dags by default); refer to this tutorial for how to create a dag, and keep the key commands below in mind
# Check syntax errors for your dag
python ~/airflow/dags/tutorial.py

# Print the list of active DAGs
airflow list_dags

# Print the list of tasks the "tutorial" dag_id
airflow list_tasks tutorial

# Print the hierarchy of tasks in the tutorial DAG
airflow list_tasks tutorial --tree

# Test your tasks in your dag
airflow test [DAG_ID] [TASK_ID] [EXECUTION_DATE]
airflow test tutorial sleep 2015-06-01

# Backfill: execute jobs that are not done in the past
airflow backfill tutorial -s 2015-06-01 -e 2015-06-07
-
Start the airflow scheduler and monitor the tasks via the web UI
airflow scheduler # Monitor the your tasks via the web UI (success/failure/scheduling, etc.)

# Remember to turn on the dags you want to run via the web UI, if they are not on yet
-
[Optional] Put your dags in remote storage, and sync them with your local dag folder
# Create a daemon using crons to sync up dags; below is an example for remote dags in S3 (you can also put them in remote repo)
# Note: you need to have the aws command line tool installed and your AWS credentials properly configured
crontab -e
* * * * * /usr/local/bin/aws s3 sync s3://your_bucket/your_prefix YOUR_AIRFLOW_HOME/dags # Sync up every minute
-
[Optional] Add access control to the web UI; add users with password protection, see here. You may need to install the dependency below
pip install flask-bcrypt
Phase 2: Adopt Pseudo-distributed Mode Using Local Executor
Under the pseudo-distributed mode with a local executor, the local workers pick up and run jobs locally via multiprocessing. If you have only a moderate amount of scheduled jobs, this could be the right choice.
-
Adopt another DB server to support executors other than the sequential executor; MySQL and PostgreSQL are recommended; here PostgreSQL is used as an example
# Install postgres
brew install postgresql # For Mac, the command varies for different OS

# Connect to the database
psql -d postgres # This will open a prompt

# Operate on the database server
\l # List all databases
\du # List all users/roles
\dt # Show all tables in database
\h # List help information
\q # Quit the prompt

# Create a meta db for airflow
CREATE DATABASE database_name;
\l # Check for success
-
Modify the configuration in AIRFLOW_HOME/airflow.cfg
# Change the executor to Local Executor
executor = LocalExecutor

# Change the meta db configuration
# Note: the postgres username and password do not matter for now, since the database server and clients are still on the same host
sql_alchemy_conn = postgresql+psycopg2://your_postgres_user_name:your_postgres_password@host_name/database_name
-
Restart airflow to test your dags
airflow initdb
airflow webserver
airflow scheduler
-
Establish your own connections via the web UI; you can test your DB connections via the Ad Hoc Query (see here)
# Go to the web UI: Admin -> Connection -> Create
Connection ID: name it
Connection Type: e.g., database/AWS
Host: e.g., your database server name or address
Scheme: e.g., your database
Username: your user name
Password: will be encrypted if airflow[crypto] is installed
Extra: additional configuration in JSON, e.g., AWS credentials

# Encrypt your credentials
# Generate a valid Fernet key and place it into airflow.cfg
FERNET_KEY=$(python -c "from cryptography.fernet import Fernet; FERNET_KEY = Fernet.generate_key().decode(); print FERNET_KEY")
Phase 3: Extend to Distributed Mode Using Celery Executor
Under the distributed mode with a celery executor, remote workers pick up and run jobs as scheduled and load-balanced. As being highly scalable, it is the choice when you expect heavy and expanding loads.
-
Install and configure the message queuing/passing engine on the airflow server: RabbitMQ/Reddis/etc; RabbitMQ (resources: link1 and link2)
# Install RabbitMQ
brew install rabbitmq # For Mac, the command varies for different OS

# Add the following path to your .bash_profile or .profile
PATH=$PATH:/usr/local/sbin

# Start the RabbitMQ server
sudo rabbitmq-server # run in foreground; or
sudo rabbitmq-server -detached # run in background

# Configure RabbitMQ: create user and grant privileges
rabbitmqctl add_user rabbitmq_user_name rabbitmq_password
rabbitmqctl add_vhost rabbitmq_virtual_host_name
rabbitmqctl set_user_tags rabbitmq_user_name rabbitmq_tag_name
rabbitmqctl set_permissions -p rabbitmq_virtual_host_name rabbitmq_user_name ".*" ".*" ".*"

# Make the RabbitMQ server open to remote connections
Go to /usr/local/etc/rabbitmq/rabbitmq-env.conf, and change NODE_IP_ADDRESS from 127.0.0.1 to 0.0.0.0 (development only, restrict access for prod)
-
Modify the configuration in AIRFLOW_HOME/airflow.cfg
# Change the executor to Celery Executor
executor = CeleryExecutor

# Set up the RabbitMQ broker url and celery result backend
broker_url = amqp://rabbitmq_user_name:rabbitmq_password@host_name/rabbitmq_virtual_host_name # host_name=localhost on server
celery_result_backend = meta db url (as configured in step 2 of Phase 2), or RabbitMQ broker url (same as above), or any other eligible result backend
-
Open the meta DB (PostgreSQL) to remote connections
# Modify /usr/local/var/postgres/pg_hba.conf to add Client Authentication Record
host    all         all         0.0.0.0/0          md5 # 0.0.0.0/0 stands for all ips; use CIDR address to restrict access; md5 for pwd authentication

# Change the Listen Address in /usr/local/var/postgres/postgresql.conf
listen_addresses = '*'

# Create a user and grant privileges (run the commands below under superuser of postgres)
CREATE USER your_postgres_user_name WITH ENCRYPTED PASSWORD 'your_postgres_pwd';
GRANT ALL PRIVILEGES ON DATABASE your_database_name TO your_postgres_user_name;
GRANT ALL PRIVILEGES ON ALL TABLES IN SCHEMA public TO your_postgres_user_name;

# Restart the PostgreSQL server and test it out
brew services restart postgresql
psql -U [postgres_user_name] -h [postgres_host_name] -d [postgres_database_name]

# IMPORTANT: update your sql_alchemy_conn string in airflow.cfg
-
Configure your airflow workers; follow most steps for the airflow server, except that they do not have PostgreSQL and RabbitMQ servers
-
Test it out
# Start your airflow workers, on each worker, run:
airflow worker # The prompt will show the worker is ready to pick up tasks if everything goes well

# Start you airflow server
airflow webserver
airflow scheduler
airflow worker # [Optional] Let your airflow server be a worker as well
-
Your airflow workers should be now picking up and running jobs from the airflow server!